Monday, February 28, 2011

Two Very Special Guests In My Kitchen Today!

Today has been an eventful day at my house. I watched two young girls from my church this morning, as their Momma had something she had to do, and this afternoon I babysat my wonderful nieces! It was truly a GREAT day!

Since I'm single, and have no children I don't have toys at my house for kids to play with. Luckily these two cuties brought their American Girl Dolls with them to keep them entertained, but I also had a few things to do with them to keep busy. Of course it involved working in the kitchen!!! :-) We baked COOKIES!!!! What kid doesn't like to help bake cookies, and of course sample them after they are done? These two were no exception, and we were really excited to be helping!

Here they are all ready to get things mixed up:
We made chocolate chip cookies...but not your ordinary, same old, chocolate chip cookies...we spiced up the recipe a little bit. And these cookies turned out Oh So Good!!!!

NOT YOUR MOTHER'S CHOCOLATE CHIP COOKIES

INGREDIENTS:
1 cup butter, softened
3/4 cup packed brown sugar
1/4 cup white sugar
1 (3.5 ounce) package instant vanilla pudding mix
2 eggs
1 teaspoon vanilla extract
2 1/4 cups all-purpose flour
1 teaspoon baking soda
2 cups semisweet chocolate chips


**NOTE** We used a White Chocolate Instant Pudding mix, and you may substitute any flavor you would like to try for the Vanilla. We also used M&M's instead of the chocolate chips! YUM

Preheat oven to 375. In a mixing bowl, cream butter and sugars.  Add pudding mix, eggs and vanilla. Combine flour and baking soda; add to creamed mixture and mix well.  Fold in chocolate chips.  Drop by teaspoonfuls onto ungreased baking sheets.  Bake for 10 to 12 minutes or until lightly browned.

Here they are all mixed up:
The girls had the best time taking turns scooping out the dough and putting it on the cookie sheet. They shared very nicely!

Here is some of our finished product:
This was the first time that I've made cookies using a recipe like this, and they turned out so soft and moist that it was unbelievable! :-) These adorable girls were so excited to have cookies THAT THEY MADE to take home and share with Mom & Dad! I had a blast with them as well!

Thanks so much for being such a great help today A. & C., I really had a lot of fun with both of you! You are welcome to help out in my kitchen anytime!

Sunday, February 27, 2011

A Simple Easy Sunday Dinner At Our House!

Today I decided that instead of having a bowl of cereal, or a whatever you can find to eat dinner that I would make something quick and easy that both the bro and I love!

From these ingredients can you guess what I'm making?


Obviously, it must be some type of sandwich!!!! If that's what you were thinking you would be right. Although, this is no ordinary sandwich, it is one filled with some yummy goodness!

HAWAIIAN HAM & CHEESE SANDWICHES

INGREDIENTS:
8 Slices of Bread
Deli Ham
4 Rings of Pineapple (I use 6, slicing 2 in half using an extra half on each sandwich)
4 Tbsp. Miracle Whip
4 Cheese Slices (I use Swiss)

Spread Miracle Whip on 4 slices of bread and place on cookie sheet. Top with ham, pineapple & cheese; and top with other slice of bread. Bake in a 350 oven for 10-15 minutes, until hot. The bread will be nice and toasty and the cheese just a little melty!

Here they are before going in the oven:

This will be served alongside some Jello salad that we somehow have managed to keep around all week! Don't know how that happened, maybe because I put some in a container in the back of the fridge, and hid it just for today? Hmmm, sneaky I am!!!

Now I can't wait for dinner to be ready! YUM

Enjoy!

Saturday, February 26, 2011

A Few New Recipes & Something A Little Different!

I have been very proud of myself this week! I made a menu plan for the week on Monday morning before going to the grocery store, and I've stuck with it!! Woohoo!!!! :-) I just love it when a plan comes together!

Today I have a few new recipes to share with you all, and I hope that you will like them. The first is what's for dinner tonight in our house.

SLOPPY JOE BAKE:

Here are a few items that you will need to make this dish:
**NOTE** You will also need a large yellow onion, I already had onion cut up in my fridge from a previous recipe!

INGREDIENTS:
1 1/2 Lb. Ground Beef
1 Large Yellow Onion; chopped
2 Cans (14-16 oz each) Sloppy Joe Sauce (Manwich)
3 C. Rotini Noodles; uncooked
1/2 C. Water
1 C. Shredded Cheddar Cheese

Heat oven to 350. Grease a 9x13 pan. Brown the beef and onion in large pan over medium heat 8-10 minutes, or until beef is no longer pink. Pour off drippings. Stir in sloppy joe sauce, uncooked rotini and water; mix well. Spoon beef mixture into pan; cover tightly with aluminum foil. Bake for 35-40 minutes, until pasta is tender. Uncover; sprinkle with cheddar cheese and bake uncovered for 5 minutes.

All set for the first time in the oven:

And here is this delish meal all dished up:

The steam is just rolling off of this as I was taking this picture!

Since this is a pasta dish, I thought that it would be fitting to also share a recipe that I have acquired for homemade alfredo sauce. I have used this and it is so yummy!

ALFREDO SAUCE:

INGREDIENTS:
1/2 C. Butter
1 Pkg. (8 oz.) Cream Cheese
1 C. Half & Half
1/3 C. Parmesan Cheese
1 Tbsp. Garlic Powder
Pepper to Taste

In a saucepan melt the butter and the cream cheese. Add all the other ingredients and stir together. I heated just until boiling and then let it sit for about 3-4 minutes.

I have a wonderful group of friends that I am lucky enough to attend church with, and each Sunday night except for the first Sunday of the month, which is Bibly Study night we head over to one of our friends houses for a fun time of fellowship, and of course, FOOD!!!! Everyone brings something, and the fun part is not knowing if you are going to end up with 10 desserts and no main dish or vice versa! There are times that it doesn't work out to go anywhere, but in the end it's fine because if I've made something, it is no problem getting the brother to help eat it up! With tomorrow being Sunday I decided that I needed to figure out what to make...I decided on this:

RASPBERRY DESSERT
(Doesn't this sound yummy?)

Here are items you will need:


INGREDIENTS:
2/3 C. Butter
4 C. Powdered Sugar
2 Eggs
2 tsp. Vanilla
2 C. Graham Cracker Crumbs
1 Stick Margarine
Raspberries
Cool Whip or Whipped Cream

Cream together butter and powdered sugar. Add eggs and vanilla. Beat until smooth and creamy; set aside.

Here is the creamy mixutre:

YUMMMMM
Mix graham cracker crumbs and margarine together. Press in bottom of 9x13 pan. Spread the creamy mixture over crumbs. Sprinkle with whole, well drained or fresh raspberries. Top with Cool Whip. Chill.

Here is the finished dish:
It is going to be so hard to not touch this scrumptious dessert! So easy, and the BEST part? No baking required!!! Thanks Aunt T. for this recipe, it's sure to be a hit!

Okay, since this is my blog I can do with it what I want, right? In that case, I decided that I wanted to share some crafty items with you!  I know that this is a cooking blog...but I like to spice things up a little bit every now and then! Haha I would like to first share with you an AWESOME item that I won from my cousin's blog: My cousin J. is EXTREMELY crafty! I LOVE it! This is something that she made, and her plan was to give 1 away, but due to the overwhelming response she got she decided to make one for everyone that commented on that particular post.


It is a flower pin! She made them right around Valentine's Day! Don't you just love the back? I received mine in the mail today, and I can't wait to put it to use! Thanks so much J.!!!! She makes A LOT more than just these cute things, if you can't checked out her blog yet, you really should! Here's the link to get you started: http://cleveringfamily.blogspot.com/ 

I also have other talents, other than cooking! SHOCKING, I know!!! ;-) I LOVE to crochet, and have kept busy crocheting baby blankets for a long time. I love to find new, different types and colors of yarn and make them into blankets. I then give these blankets as gifts to family and friends as they have new babies! My cousin J. and I talked at Christmastime about setting up an Etsy site to sell the crafty things that we make. We have yet to do that, but it is in the works. In the meantime here are some of the blankets that I have made since Christmas.
I LOVE this Pink Camo yarn! And this blanket!

A nice blue and green for a boy!

This one is Blue Camo, and I love this one too!

This yarn was so fun to work with.

This one I made and gave to my brother and sister-in-law for my nephew that is due to arrive in May of this year! I can't wait to meet him!

I have a few more that are done as well, but I won't post all of the pictures now! If you want to see more, just let me know. I have made several more, but I have given some away as gifts already this year...as far away as Texas & Iowa, and close to home here in Michigan. If any of you are interested in any of these blankets, please let me know.

Thanks for letting me veer of course a little on this post! I hope that you enjoyed it.


Thursday, February 24, 2011

Almondy Goodness!

Today in our house has been deemed "Leftover Day." I am still not feeling the greatest and thus I DO NOT feel like cooking! See, I knew that there was a reason that I was so industrious earlier this week and made things that were easily reheated at a later date, and would still be just as yummy! When I put my mind to it I can plan ahead! Funny how that happens!! :-)

With that said, I did want to share a recipe with you today. This one is for a yummy, simple dessert. Being a true Dutch girl, I'm in touch with my love for all things Almond!!! This just happens to be one of those things!

ALMOND BARS

INGREDIENTS:
1 C. Almond Paste
2 Eggs; beaten
2 C. Sugar
2 Sticks Margarine; softened
2 C. Flour

Mix all ingredients together. The batter will be quite stiff. Spread into a lightly greased 9x13 pan. Bake at 325 for 35-40 minutes.

Here it is all mixed up:
Ready for the oven:

And last, but not least, here it is after it has cooled:
Look at how nice and golden it is! How can you resist all of this almondy, ooey-gooey goodness? You will want to cut these small because they are very rich...but oh so good!!! Or is it just the Dutch girl in me that thinks they are so yummy?

Tuesday, February 22, 2011

~~Another Yummy Day In My Kitchen!~~

I started off the day today with an even more stuffed up nose than I had yesterday. I realized that the yummy goodness I was going to be making today, I wouldn't be able to smell any of it! :-( In some ways this is a good thing, since one of my recipes required onions and I LOATHE onions, so this would make that task all the more easy. But for the second recipe of the day, I really would've like to have smelled it while it was baking. Guess it gives me something to look forward to the next time I make it, huh?!?

CHILI CON CARNE

Items that are essential to this recipe:
INGREDIENTS:
1 1/2 Lb. Ground Beef
4 Medium onions, diced
1 1/2 C. Green Pepper; diced
4 1/2 tsp. Chili Powder
1 Clove Garlic
1 Qt. Diced Tomatoes
6 oz. Tomato Paste
2 Tbsp. Brown Sugar; packed
2 tsp. Oregano
1 tsp. Paprika
3 Cans Red Kidney Beans

Cook meat, onion, garlic, and green pepper-about 15 minutes, until meat is browned. Add chili powder. Cook 1 minute. Stir in tomatoes and their liquid, tomato paste, brown sugar, oregano and paprika. (I also put water in the can of paste twice and swish around and pour in the pot). Heat to boiling. Reduce to low, cover and simmer for 45 minutes. Stir occasionally. Stir in the beans and their liquid. Reheat and serve.

Here it is:

I also decided that I wanted to make some sort of bread today. I came across this recipe from my Aunt B. It just sounded so good!
Items you will need:
FRIENDSHIP BREAD

INGREDIENTS:
1 C. Vegetable Oil
1 1/2 C. Sugar
1 tsp. Vanilla
3 Large Eggs
1 1/4 C. Milk
1/2 tsp. Salt
2 tsp. Cinnamon
2 1/2 C. Flour
1/2 tsp. Baking Soda
1 (3.4 oz.) Box Instant Vanilla Pudding
1 1/2 tsp. Baking Powder
Additional Cinnamon and Sugar mixed together.

Combine the salt, cinnamon, flour, baking soda, pudding and baking powder. Set aside. Mix the oil, sugar, vanilla, eggs and milk together. Mix in the dry ingredients. Grease 2 large loaf pans and sprinkle with a mixure of cinnamon and sugar. Pour the batter into the pants and sprinkle with more cinnamon and sugar mixture. Bake for 1 hour at 325.

Just before baking:

My brother J. told me that this bread smelled AWESOME while it was baking! I'm so sad that I was not able to smell it, but I'm sure that it will taste great and more than make up for not being able to smell it.

Now just waiting for this to cool:

I can't wait to have a slice of this! I hope that you will make this and enjoy it as well!

Monday, February 21, 2011

~Busy Day In Missie's Kitchen~

This post will contain a few different recipes today. The reason is that it was a bit of a busy day in my kitchen. For several reasons: One being that I woke up this morning with a horrendous sore throat, stuffy nose, and headache...not sure where all of this came from but I do know that it's been less than a week since I kicked Severe Bronchitis/Upper Respiratory Infection out of my system. So, not knowing how I will feel the rest of the week I wanted to prep some items so that my brother will still have some yummy items to eat! Second, my brother has been working VERY hard at work and a crazy schedule so I wanted to be a nice sister and make him a few things that I know he likes! See...I can be nice every once in a while! Hahaha

Let's start off with Today's Menu:

BAKED CHICKEN BREASTS WITH CHEESE:

Here are a few items that you will need to make this recipe:
As you can see, there really are not a lot of ingredients needed!

INGREDIENTS:
4 Chicken Breasts; skinned (I buy the bonless/skinless)
4 Slices Swiss Cheese
1 Can Cream of Celery Soup
1/4 C. Dry White Wine (If you don't have the wine you may substitute Water)
1 C. Herbed Croutons
3 Tbsp. Butter

Arrange chicken in greased, shallow baking dish. Put cheese slices over chicken. Mix soup and wine (or water); pour over cheese. Sprinkle with croutons and dot with butter. Bake at 350 for 1 hour.

Here's what this yummy dish looks like before baking:

I must tell you, that from the little that I could smell due to my stuffed up nose, the smells wafting from my oven were good!
After baking:

I had to decide what to serve as a side dish for this, and I came up with Herbed Corn. Oh, it's so yummy and makes eating plain old corn just not feel right!

HERBED CORN:

INGREDIENTS:
12 C. Frozen Corn
1 C. Water
1/2 C. Butter; cubed
2 Tbsp. Fresh Parsley; minced
2 tsp. Salt
1 tsp. Dill Weed
1/2 tsp. Garlic Powder
1/2 tsp. Italian Seasoning
1/4 tsp. Dried Thyme

In a large saucepan combine the water and the corn. Bring to a boil. Reduce heat; cover and simmer for 4-6 minutes or until corn is tender. Drain, stir in the remaining ingredients.

***NOTE*** I have to admit that I didn't make it this way tonight. I cheated and used a box of frozen corn that I had in the freezer that had butter on it already. It was easy to just pop it in the microwave and then add the seasonings after. I didn't have the parsley, but it was still very good!
Here is what mine looked like tonight:

As I said, it was a busy day in my kitchen today. I also made two other recipes today. These were fun ones to make, and will compliment meals that I have planned for later this week.

ORANGE TAPIOCA SALAD:

Here are some items you will need:

INGREDIENTS:
1 Box Vanilla Tapioca (3 oz.)
1 Box Vanilla Pudding (3 oz. NOT INSTANT)
4 C. Water
1 Box Orange Jell-O
2 Cans Mandarin Oranges; plus juice from 1 can

Mix together the Tapioca, Vanilla Pudding and water in saucepan. Bring to a boil and cook until slightly thickened. Take off stove and add the Orange Jell-O, Mandarin Oranges and juice. Chill in fridge for 24 hours before serving.

***NOTE*** I used 1 large can of oranges I had in the house and just drained some of the juice from the can.

Here it is:

And last, but definitely not least I made Ribbon Salad! This is exciting for me, as I normally only get this at Christmas Time because I haven't made it before.
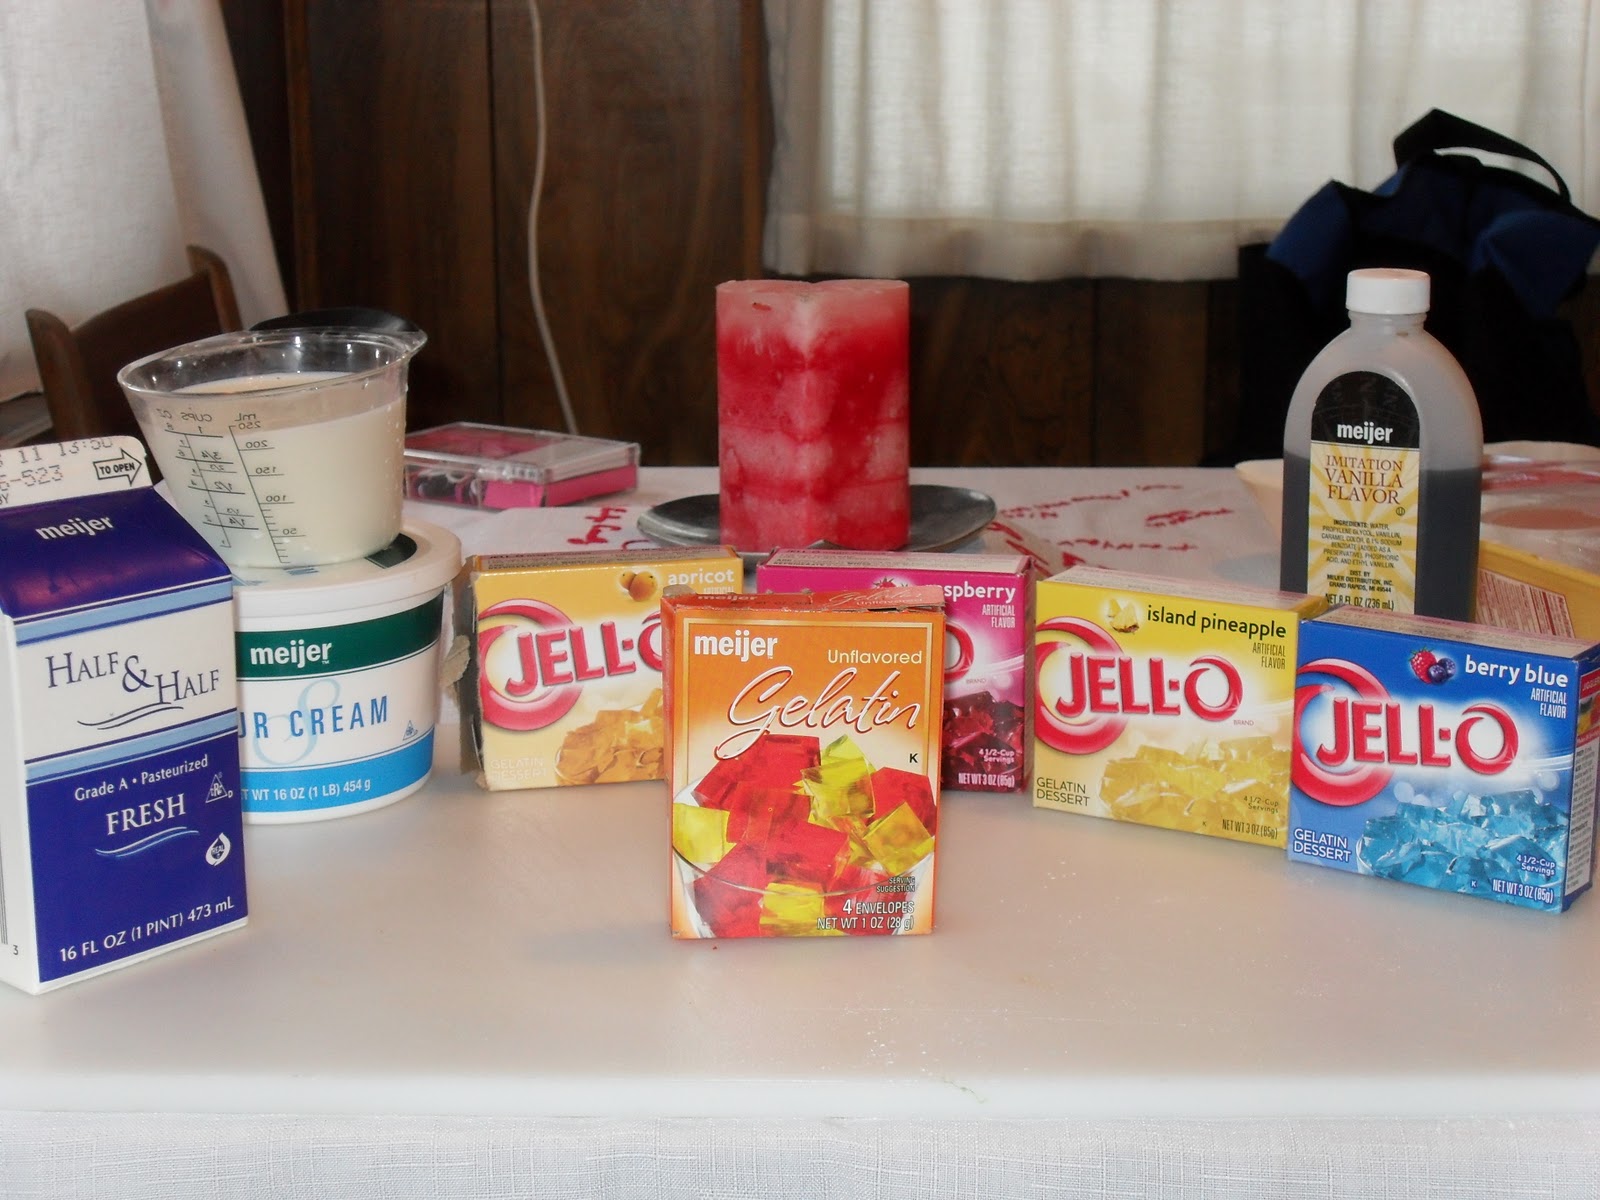
Some items needed:
RIBBON SALAD:
2 C. Light Cream or Milk (I used 1 C. Half & Half & 1 C. Milk)
1 C. Sugar
2 pkgs. Knox Gelatin (The box in picture has 4 pouches in it, you would use 2)
2 tsp. Vanilla
1 Pint Sour Cream
4 Different Flavors of Jell-O (3 oz. each) (Ex. red, orange, green, yellow)

Jell-O Layers: Dissolve 1 Jell-O in 1 C. Boiling Water and 1/2 C. Cold Water. MAKE EACH JELL-O JUST BEFORE YOU USE IT FOR THE LAYERING
Cream Layers: Boil light cream/milk and sugar to disolve. This this add Knox Gelatin which has been dissolved in 1/2 C. Cold Water. Let cool and then add 2 tsp. Vanilla and 1 pint of sour cream.
Put one layer of Jell-O into a 9x13 pan. Chill in fridge until firm. Then spoon out some of the cream mixture to make a layer. let harden completely in fridge before adding the next Jell-O layer. Make the next Jell-O layer and chill in fridge until firm. Spoon another layer of cream mixutre, and place in fridge to firm up. Make another Jell-O layer and let firm up in fridge. Spoon the last of the cream mixture to form another layer and let firm up in fridge. Make the last package of Jell-O and pour over the top and place back in the fridge to firm up. Then it's ready for serving.

Here is my finished product. I used Apricot, Raspberry, Island Pineapple and Berry Blue Jell-O's!

As you can see some of my layers are a little thicker than others. I found out that the shelves in my fridge are not exactly even! Oh well, it will still taste AWESOME!

I hope that you will try some these recipes and enjoy them as much as we do here in my house!

A Super Easy Recipe! Great For A Snow/Ice Day!!!

This recipe is courtesy of my Aunt T.! It is super easy and SUPER delicious!!! This has become a favorite in our house.

Beef Stew:

Ingredients:

1 1/2 Lb. Beef Stew Meat
1 Envelope Dry Onion Soup Mix
1 Lb. Sliced Carrots
5 Medium size potatoes; diced
1 Can Cream Of Mushroom Soup
1/3 C. Water

Put stew meat in bottom of a 9x13 pan. Sprinkle onion soup mix over the meat. Add sliced carrots and diced potatoes. Mix mushroom soup and water together. Pour over potatoes. Cover with foil and bake at 325 for 2 hours.

I hope that you will enjoy this as well!

Saturday, February 19, 2011

Recipe For: Blood Clot In A Bucket!

I am sure that after reading this title many of you are wondering if I have lost all of my marbles, and why ever would she post something with THAT name? But, please bear with me here...this is actually a very tasty dessert! I am posting this in honor of a follower of my blog. Someone that I used to work with at FPS/DHS in my dispatching days...This one's for you EVR!!! He really took a liking to this food and would always have a large portion when I would bring it into work. So I thought that it would be fitting to post this for him!

Blood Clot In A Bucket:

Ingredients:
1 (15 oz) Can Crushed Pineapple; drained
1 Large Can Cherry Pie Filling
1 Can Sweetened Condensed Milk
1 (12 oz.) Cool Whip

Mix all of the above ingredients together and chill in the refrigerator for at least 2 hours before serving.

The reason that this is called Blood Clot In A Bucket is because when I would make it, I would put it in an Ice Cream bucket and the Cherry Pie Filling tints the entire concoction pinkish/red. I am not responsible for the name...actually EVR is! Despite the name, I hope that you will give it a try!

AND THE WINNER IS..........

I would like to thank all of you that took the time and left comments, either here or on my Facebook page with name ideas for my blog! As you can tell I did FINALLY decide on a name...Well, that's not exactly true, I was having a hard time deciding so I had a little help! LOL

So, the winner is my cousin J! You may thank your Aunt K. for that one! I just read her the names that had been left for me to choose from, and didn't tell her who had posted them, so she really had no idea who was going to be the winner. No cheating over here, I tell ya! It was a really close race between this name and one that my friend E. posted. I will get your Pampered Chef Microfiber Dishcloths to you soon, and I hope that you enjoy them!

Thursday, February 17, 2011

~Name Change~

Tonight a friend advised me that I might want to change the name of my blog since Betty Crocker is a Trademarked name to avoid any conflicts that this might cause. After thinking about this, I decided that they are probably right. Now the dilemma is...WHAT DO I CHANGE THE NAME TO?????

So, I thought that I should make a post here and ask for suggestions from all of you! I would love it if you would leave your thoughts on what you think I should call my blog. You can either do so by commenting here or leaving me a comment under this post on Facebook. To make things a little more interesting I have decided that I will give a small prize to the winning name that I choose! Mind you, this prize will not be something big and elaborate, just something to thank you for helping me come up with a new name. Since this blog is all about cooking/baking, it of course, will be something useful in the kitchen. It is a set of two microfiber dishcloths. I have some, as well as some towels that I use in my kitchen and I love them!!!!
As you can see they are two pretty colors. A light green and a lavender. I hope that you will help me out with this search for a new name! Thanks so much, I really appreciate your help!!!! I hope to have a new name in the next day or so.

Wednesday, February 16, 2011

A Crazy Wednesday Meal Idea

Well today has definitely been an eventful one! I went to BSF this morning and it was great to study Isaiah 42 & 43...this study has really been relevant to a lot of things that are going on in our world today! It's amazing to see how the Lord works! As I blogged yesterday I was to have a fellowship time at one of the lady's homes from my small group, well we abandoned that plan as there were only 4 of us that were able to attend. Instead she asked if we would mind going to a local Mexican restaurant called On The Border, as she had gift certificates and would treat the other 3 of us to lunch. So, this is what we did...it was a really nice time and I got to know these 3 women a little better today. Now the dilemma was, what do I do with all of this Chicken Pasta Salad that I have? Since it's just my brother and I at our house I knew that we could eat it all, but the chances of that happening were very slim, since we would be sick of it before it was gone...I decided to call a good friend of mine and see if she and her family would like to have some of this yummy stuff! Thankfully she was happy to have some, so I got out a bowl and scooped out some and went and had a nice visit with her and even got to see her kids for a bit after they got up from their naps! Always a bonus in my book!

Tonight's menu at our house is.....you guessed it Chicken Pasta Salad with Cashews & Dried Cranberries! But, I also made Egg Salad! I am very excited about this Egg Salad, for you see it is not your typical recipe for Egg Salad....it is a recipe commonly used in Northwest Iowa that is eaten there on Rusk Buns...Oh how I miss Rusk Buns! :-( Nevertheless I have been craving Egg Salad since I came across the recipe in the Bos Family Cookbook, so I decided to make some for tonight's supper. It looks and smells delicious and I cannot wait to have some...but alas it will have to be on a regular bun, but that's alright because I'm sure that it will still be wonderful.

EGG SALAD

Ingredients:

1 Tbsp. Butter
1 Tbsp. Flour
2 Tbsp. Sugar
1/2 tsp. Salt
3 tsp. Vinegar
1 Beaten Egg
1/2 C. Half & Half
1 Tbsp. Onion, minced
8 oz. Cream Cheese
8 Hard Boiled Eggs; chopped

Boil the first 7 ingredients together until thick. Cool in the pan until you can hold your hand on the bottom of the pan. Then, stir in the next 3 ingredients and cool completely. Then spread on whatever type of bread product you would like, and enjoy!

If you have never had Egg Salad made like this, my hope is that you will try this simple and easy recipe!

Tuesday, February 15, 2011

A Dish To Bring To Any Get Together

This year I started attending BSF (Bible Study Fellowhip) that meets in a church not far from my house. There are A LOT of women that attend the meeting that I do. This is my first year at BSF, and I started going after my sister-in-law encouraged me to attend and I'm so happy that I did. We are studying Isaiah this year, and it has been amazing to see how awesome the God that we serve is! I have definitely been blessed going to this study. We meet each Wednesday morning and start out with a time of singing praises, praying and getting general announcements. We then break up into our smaller groups, each one has a place to meet and a discussion leader. I have been blessed with a wonderful group of women in my small group, and it's always an encouragement throughout the week to know that each of them is praying for me, as I am them. We then all meet back in the sanctuary for our lecture time, which helps us to delve just a little bit farther into the chapter(s) we are studying that week. I am just so thankful that the Lord saw fit to leave my schedule open enough that I can attend this Bible Study. Anyway, every once in a while we have an after group fellowship that meets at one of your small group members homes, and everyone brings a dish to pass and we have a topic of discussion. We were supposed to have our second fellowship a few weeks ago when the Blizzard of 2011 hit and we had to cancel BSF. So, we are having our fellowship tomorrow, which meant that I needed to get a dish together tonight. I had signed up to bring a salad, and so I decided that this would be the perfect one to take:

CHICKEN PASTA WITH CASHEWS & DRIED CRANBERRIES

Here is just a few of the items you will need for this recipe:
Ingredients:

3 C. Bowtie Pasta; cooked according to directions
1 (16 oz.) Bottle Coleslaw Dressing
1/2 C. Mayonnaise
1/2 C. Miracle Whip
4 C. Cooked Chicken; cubed
1 1/2 C. Green Grapes; halved
1 1/2 C. Red Grapes; halved
2 C. Celery; sliced
2 C. Cashew Halves
2 C. Dried Cranberries
Optional:
2 (5 oz.) Can Water Chestnuts; drained and quartered
1/2 C. Green Onions; sliced

Bring large pot of lightly salted water to a boil. Add pasta and cook for 8-10 minutes. Drain and set aside. In medium bowl, whisk together coleslaw dressing (I use Marzetti's), mayo and miracle whip. In large bowl, combine pasta, chicken, grapes, water chestnuts (if used), green onions (if used) and celery. Stir in dressing and mix well. Place in refrigerator for 2 hours or overnight. Mix in cashews and dried cranberries just before serving.

I have to thank my sister-in-law for this recipe! It has been made many times by family members and myself, and it's always a hit!

A few years ago my Mom's side of the family decided that we should put together a cookbook using recipes from people in our family. Everyone, including my great aunts, 2nd cousins, etc., were asked to submit some of their favorite recipes. My cousin J then took the time to type them all up, and my Aunt B. made the cover and put the books together. The result was a wonderful cookbook called "Bos Family Favorites." I have been using this cookbook a lot lately to come up with some ideas for things to make lately. So, for those of you that are in my family that is why some of these recipes look familiar! I LOVE this cookbook and think that it was such a great way to pass down recipes through the generations!

Monday, February 14, 2011

Valentine's Day Menu!

I would like to wish all of you a very HAPPY VALENTINE'S DAY!!! I hope that it was wonderful! Since both my younger brother and I are single I had to come up with a meal plan for tonight...He and I have lived together for the past 3 years, and it has been pretty nice having someone else around...especially someone that doesn't mind trying out some of the new things that I try! Always get an honest feedback, and I like that!!! I'm always the first person to tell people that if they don't like something that I've made to let me know, I WON'T be offended in the least. I just know that I shouldn't make that particular item again!

On Today's Menu: Pizza Burgers

Here are some of the ingredients you will need:


INGREDIENTS:

2 lb. Ground Chuck
1 1/2 tsp. Anise Seed
1 1/2 tsp. Oregano
Salt & Pepper to taste
1/2 Green Pepper; chopped
1 (15 oz.) Can Pizza Sauce
8 oz. Shredded Cheese
8 English Muffins (16 halves)

Brown meat and drain the grease. Add salt, pepper and green pepper. Mix in oregano and anise seed. Add pizza sauce and stir together. Simmer on stovetop for 15 minutes. Spread on English Muffin halves and top with shredded cheese. Broil for 3-4 minutes, until cheese melts.
***NOTE***
I used Ground Turkey and since my broiler isn't the best I just baked in the oven at 350 for 5 minutes to melt the cheese. I also made the whole recipe amount, but only used a portion of the meat mixure and the English Muffins, since 16 is WAY to many for 2 people! I just put the rest of the meat in the refrigerator to be used again later this week. I also added some grape tomatoes to ours, since we love tomatoes on our pizza!

Ready for the oven:
After I baked them for 5 minutes:

While I was waiting for this wonderful meal simmer on the stove and bake in the oven I took care of doing all the dishes! Now, mind you, dishes are my arch-nemesis! I dislike dishes with a passion! If there was ever a reason to NOT cook or bake these would be it, but since I do love to cook/bake I'm forced to put up with them. It does make it easier to handle if I just do them as I'm going along instead of letting them pile up!

My arch-nemesis:

Oh, and for those of you that were wondering what those SCRUMPTIOUS Pineapple Cheesecake Bars look like after they are cut out of the pan....here it is:

OH SO YUMMY!!!! I hope that you are enjoying my posts so far, and I hope that I can supply some of you with some alternatives to the things you've been making! I would love to hear about it, so please don't be afraid to leave me some comments!

Saturday, February 12, 2011

A Favorite Of Mine!

Good Afternoon! I thought that I would just share a favorite dessert recipe of mine! I received this recipe from a friend's Aunt, and I made it for my family around Christmas time and they loved it as well...it really is an easy recipe to make! I would however make a few changes...I will add what I would do differently at the end of the recipe, and you can decide on how you would like to make them.

SPICED PUMPKIN TARTLETS

1 Pkg (15oz) Refrigerated pie crusts
1 Jar (9oz) Pumpkin butter
1 1/2 cup Whipped topping
1 box (3.4oz instant cheesecake pudding mix)
1/4 C. Chopped pecans
Let pie crust stand at room temperature for 15 minutes unroll pie crust into circles. using a 2 1/2 inch round cutter. cut out 12 circles (9 from out edge, 3 from center) from each crust. Press 1 circle into each cup of a mini-muffin pan. Prick bottom of pastry. Bake 12-16 minutes or until golden brown. Cool completely. Fold together pumpkin butter & whipped topping in bowl and whisk until smooth. Add pudding mix, whisk until smooth & thickened. Pipe pumpkin mixture into tart shells. Sprinkle pecans over tarts. Keep Refrigerated 
***NOTES***
I was not able to find any pumpkin butter in the stores so I made my own and it turned out fantastic! I will include that recipe here as well. Again, a very simple and easy recipe...although it yields mor than what you need for this recipe, it's always good on toast!
For the crusts I did use the Pillsbury, but found that they baked to fast...so next time I'm going to use a different crust and I will also include that recipe here.
PUMPKIN BUTTER
1 (29 ounce) can pumpkin puree
3/4 cup apple juice
2 teaspoons ground ginger
1/2 teaspoon ground cloves
1 1/2 cups white sugar
2 teaspoons ground cinnamon
1 teaspoon ground nutmeg

Combine pumpkin, apple juice, spices, and sugar in a large saucepan; stir well. Bring mixture to a boil. Reduce heat, and simmer for 30 minutes or until thickened. Stir frequently. Transfer to sterile containers and chill in the refrigerator until serving. You can also put this in a jar and seal it for later use!

MINI TART CRUSTS


2 cups margarine
4 (3 ounce) packages cream cheese
4 cups all-purpose flour

In a medium bowl, mix together the margarine and cream cheese until well blended. Beat in flour, 1 cup at a time, until the mixture forms a smooth dough. Roll into small balls, and press into the bottoms and sides of tart pans or mini muffin pans.

I hope that you will try these recipes and enjoy them as much as I did!

Friday, February 11, 2011

How My Blogging Came To Be & Today's Menu!

Hello All! I am totally new to this blogging thing...sure I'm following several blogs, including some of my families, but never really thought about doing my own. So, after much prodding from my cousin J, (who has her own blog! Check it out here: http://cleveringfamily.blogspot.com/ ) I decided to set up this blog! As you can see from the title it would mostly be about food dishes I'm making...she urged me to do this after I had been posting all the YUMMY foods I've been making on my Facebook page! I LOVE, LOVE, LOVE to cook and bake! My mother tells me that she has no idea where I got this knack from, since she is not really that excited about cooking or baking...hmmm has to be in the genes somewhere I would think?!? Anyway, that is how this blogging came about. I'm going to attempt to keep you all up-to-date on my favorite recipes.

The Menu for 02/11/2011 is: CURLY CHICKEN NOODLE SOUP & PINEAPPLE CHEESECAKE BARS!

These are some of the items you will need for the Curly Chicken Noodle Soup:
INGREDIENTS:
2 Tbsp. Olive Oil
2 Tbsp. Butter
1 lb. Chicken Breasts; cut into 1/2" cubes
1 large Onion; chopped
4 Celery Ribs; sliced
2 Medium Carrots; sliced (I use a few more)
4 Garlic Cloves; minced (I use minced garlic from the jar about 1/2 tsp.)
1/4 C. Flour
1 tsp. Basil
1/2 tsp. Oregano
1/8 tsp. Pepper
3-14 oz. Chicken Broth
14 1/2 oz. Diced Tomatoes; undrained
6 oz. Tri-Color Rotini Pasta

Saute Olive Oil and Butter with Chicken, Onion, Celery, Carrots, and Garlic in pan until chicken is no longer pink. Stir in Flour, Basil, Oregano, and pepper. Gradually add in Chicken Broth and Tomatoes in their juices. Stir together well. Bring to a boil, reduce heat and simmer COVERED for 1 hour. Return to a boil and add Pasta and cook according to package directions.
***NOTE***
Once the pasta is added it soaks up a lot of the broth. It is okay when first made, but with leftovers you will want to add more broth, otherwise it resembles goulash and tastes great that way as well. But, if you prefer it to be more of a soup the 2nd go around, you will want to add more broth!

Here is what is looks like when it's cooking on the stovetop!
Doesn't that look YUMMY?

DESSERT:
Pineapple Cheesecake Bars:

INGREDIENTS:
  • 2 cups all-purpose flour

  • 1/2 cup confectioners' sugar

  • 1/2 cup sliced almonds

  • 2/3 cup butter

  •  

  • 2 (8 ounce) packages cream cheese

  • 1/2 cup white sugar

  • 2 eggs

  • 2/3 cup unsweetened pineapple juice

  •  

  • 1/4 cup all-purpose flour

  • 1/4 cup white sugar

  • 1 (20 ounce) can crushed pineapple, drained with juice reserved

  • 1/2 cup heavy cream, whipped


    1. Preheat oven to 350 degrees F (175 degrees C). In a medium bowl, combine 2 cups flour, confectioners' sugar, and almonds. Cut in butter until mixture resembles coarse crumbs. Press into the bottom of a 9x13 inch pan. Bake in preheated oven for 15 to 20 minutes.
    2. While the crust is baking, prepare the cream cheese layer. In a large bowl, beat the cream cheese and 1/2 cup sugar until smooth. Beat in eggs one at a time. Blend in 2/3 cup unsweetened pineapple juice. Pour over hot crust and bake for about 20 minutes more in preheated oven. Allow to cool completely.
    3. Make the topping: In a saucepan, combine 1/4 cup flour, 1/4 cup sugar and 1 cup reserved pineapple juice. Bring to a boil and stir for 1 minute. Remove from heat and stir in crushed pineapple. Cool completely. When cool, fold in whipped cream. Spread topping over cream cheese layer. Refrigerate at least 4 hours before serving. (The flour, sugar and juice will resemble more of a paste once boiled. It thins out after you add the crushed pineapple)
    This looks so good to me:
    I made these two recipes today, as I will be sharing it, and brining it over to a family from church's house as they are fighting the nasty sickness that has been going around. This way the Momma there doesn't have to worry about cooking dinner tonight! I hope that they enjoy this as much as we do here!

    I also hope that all of you enjoy these as well! Let me know what you think! They are both so simple and easy to make. The total time in the kitchen for both is about 1 hour, that doesn't include the time that the soup is on the stove simmering, just your prep time. Not bad in my book!